The following tutorial shows the user how to commit a track in Pro Tools.
CLICK HERE to learn Avid Pro Tools one on one with a digital audio professional at OBEDIA.
Often times during the mixing process of a song, the engineer might encounter a situation in which there are so many tracks with active inserts in the session, that the CPU resources of the computer are considerably reduced, yielding several problems related to delay compensation and potentially crashing the computer.
On previous tutorials we have explained how to avoid these situations by “freezing” the track.
This time, we will be explaining another method that happens to be more “aggressive” but it can certainly improve the CPU resources to the maximum. This method is based on the Pro Tool’s function “Track Commit”. Once a track has been “committed”, the software basically prints the audio coming out of the track that contains the inserts, volume and pan automation, sends and groups assignments, into a new track. This new track contains all of the previous parameters printed into its audio information, therefore it will “sound” exactly the same as the previous one, but it will not tax the CPU resources because the actual audio will have all the signal processing of the inserts and other processing, applied to it. The old tracks will be kept inactive and hidden. This function is particularly useful when engineers need to share sessions and they do not have the same plugins, or when the session contains so many inserts and processing that the CPU resources are starting to fill and make the session crash.
This tutorial will present a step-by-step guide on how to commit a track in Pro Tools. The tutorial assumed the user already has audio tracks created in the session.
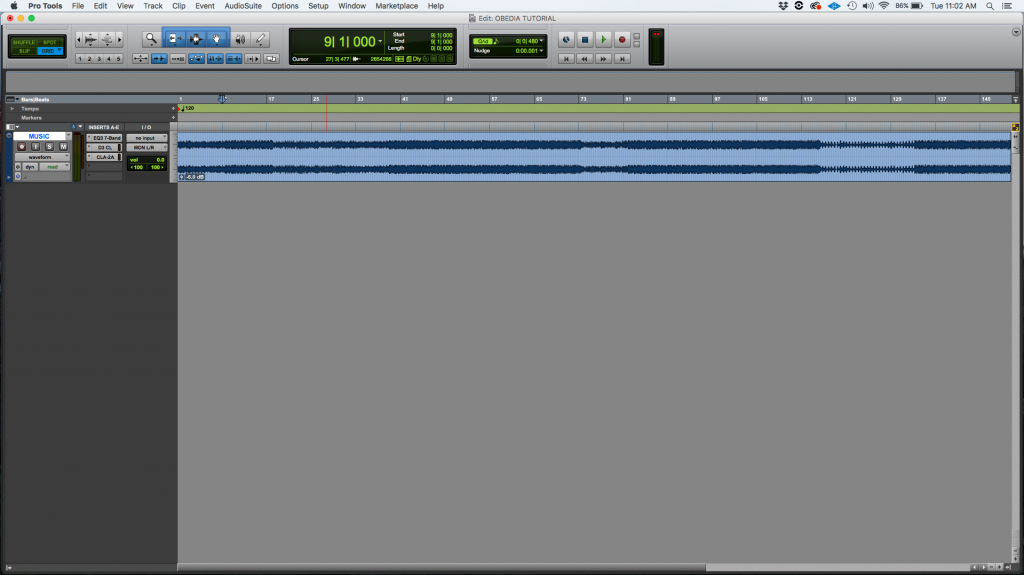
1. Open or create a new Pro Tools session:

It is easy to note how the audio track “MUSIC” contains three insert plugins applied to it. This will be the track that will be commited.
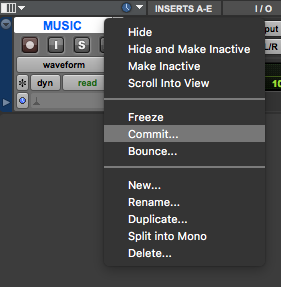
2. Right click on the track name and select “Commit”:

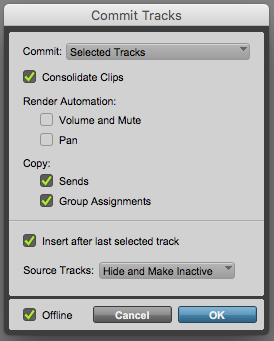
3. The “Commit Tracks” window will appear as:

This window lets the user configure the parameters of the Commit process of the selected track. By default, it is easy to see that only the “Selected Tracks” will be committed (which we only have one track selected). It will also consolidate all the clips. Automation will not be consolidated by default, which does not affect this tutorial because no automation has been added. The sends and group assignments will be copied to the committed track. The committed track will be inserted after the last selected track and the original tracks will be set inactive and hidden.
4. Press “OK” and the rendering process will happen as:

Depending on the amount of inserts or processing applied, the rendering process can take anything from a couple seconds to minutes.
After this process has finished, the new track will appear in the session as:

Note how the “committed” track is labeled with the sufix .cm for committed.
It can be seen from the tracks list, how the original “MUSIC” track appears inactive and hidden as:

If we press the play button, the MUSIC.cm track should sound the same as the original MUSIC track, but it will consume almost no CPU resources since the processing has been printed into it.
At this point the user has learned how to commit a track in Pro Tools. The tutorial has now finished.
We hope you found this tutorial on How to COMMIT a track in Pro Tools useful!
CLICK HERE to learn Avid Pro Tools one on one with a digital audio professional at OBEDIA.
