This tutorial shows the user How to use Ableton Live ARPEGGIATOR MIDI Effect
CLICK HERE to learn Ableton Live one on one with a digital audio professional at OBEDIA.
Ableton Live’s ARPEGGIATOR MIDI Effect takes the individual notes played on a chord (or a single note) and plays them as a rhythmical pattern, which is known in music as an “arpeggio”. The sequence and speed of the pattern can be controlled by this device. In this tutorial, we are going to demonstrate step-by-step how to configure this MIDI effect on a virtual instrument.
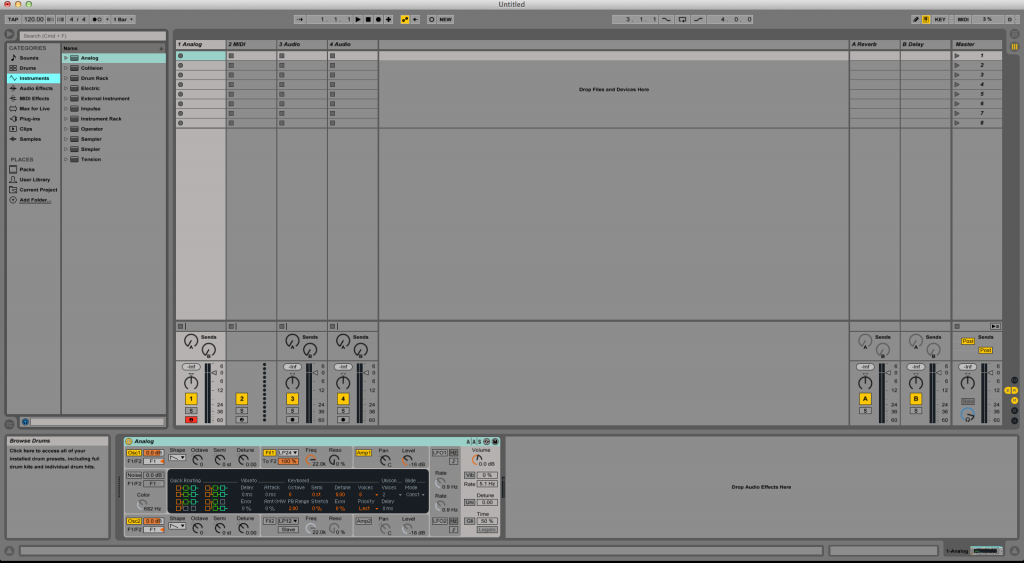
- Create a new Live session with at least one Instrument added to the first MIDI track:
2. From the browser, look for MIDI Effects -> Arpeggiator.
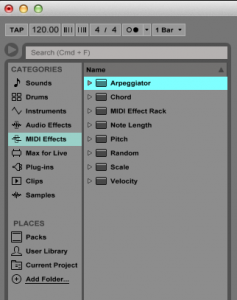
3. Drag and drop ARPEGGIATOR to add it to the first track labeled as “1 Analog”:
As soon as the Arpeggiator has been added to the track, it is easy to see how it appears before “Analog” on the device view.

4. Configure the Arpeggiator MIDI Effect:
In order to configure this effect to our needs, we must show the graphic interface of it and explain each parameter it presents:
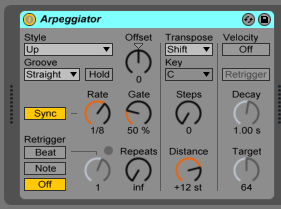
The basic parameters we will be configuring from Arpeggiator are:
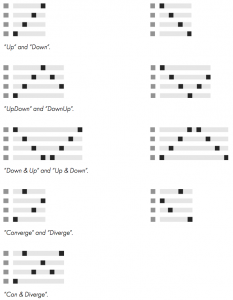
- Style: Chooses a sequence for notes in Arpeggiator’s rhythmical pattern. These can be easily explained with the following graphic:
- Groove: Selects a groove to be applied to the pattern.
- Hold: With this option active, the arpeggio will continue to play after the keys have been released. The pattern will be repeated until any other keyboard key is pressed.
- Offset: This parameter shifts the sequence of notes in the pattern by the number of steps selected.
- Sync/Free: Use this button to select whether to sync the Arpeggiator’s rate to to the song tempo or to calibrate it in milliseconds.
- Rate: This control sets the speed at which Arpeggiator will play the pattern of notes, which can be calibrated in either milliseconds or beat-time.
- Gate: This knob sets the length of notes in the pattern as a percentage of the current rate setting. If this control is set above 100%, the played notes will result in legato.
- Retrigger: This selector resets the pattern so that is starts again from the beginning depending on its configuration. If it is set to “Off”, the pattern is never triggered. When set to “Note”, it is re-triggered when a note is played. When it is set to “Beat”, it is re-triggered every set number of notes or bars.
- Repeats: This control sets the pattern to repeat a specified number of times. By default it is set to infinite; a setting of “1” will play the pattern only once.
Now that we have explained the basic parameters of the Arpeggiator MIDI effect we can configure it to our needs. For the purpose of this tutorial, we will configure the Arpeggiator to play the notes in an Up-Down style, with a straight groove at 16th note rate and we will make it retrigger every time a new note is played. The parameters will be set as:
- Style: UpDown.
- Groove: Straight.
- Hold: OFF.
- Offset: 0.
- Sync/Free: Set to Sync.
- Rate: 1/16.
- Gate: 50%.
- Retrigger: Note.
- Repeats: Inf.
Our final configuration of this device should look like the following:
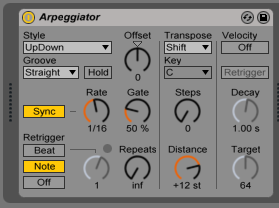
The Arpeggiator MIDI Effect has now been fully configured and can be used.
CLICK HERE to learn Ableton Live one on one with a digital audio professional at OBEDIA.
