This tutorial shows the user How to use the Ableton Live AUTO PAN audio effect.
CLICK HERE to learn Ableton Live one on one with a digital audio professional at OBEDIA.
Ableton’s AUTO PAN audio effect is one of the stock effects included in Live that gives a track a “stereo feel” by automatically panning it from left to right following a pattern of movement determined by the effect’s parameters; this saves the user from having to manually automate the pan pot of the track. One of the advantages of AUTO PAN is the ability of being able to “move” the source from left to right of the stereo field following an LFO frequency, or following the song tempo (synchronized to quarter notes, eight notes, sixteenth notes, etc).
This tutorial will present a step-by-step guide on how to configure and use the AUTO PAN audio effect in Live.
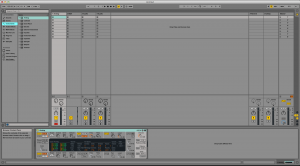
- Create a Live Set with at least one track. In this case we have a MIDI track with a mono virtual instrument assigned to it:

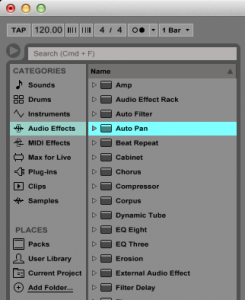
2. From the Browser, search for Audio Effects -> Auto Pan.

3. Drag and Drop the Auto Pan audio effect on top of the audio track labeled as “1 Analog”.
As soon as this effect has been dropped on top of the track, it is easy to see how the Auto Pan audio effect now appears right after the Analog virtual instrument.

4. Configure the Auto Pan audio effect for proper usage
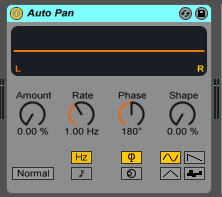
Now that we have added the effect to our audio track, we can explain each of the parameters included. The following picture shows the graphic interface of this audio effect.

Auto Pan has 8 different controls, these are:
- Amount: This knob controls the amount of LFO modulation applied to the incoming signals.
- Normal/Invert: This switch toggles the phase of the LFOs.
- LFO Rate Type: This switch toggles from Hertz to song tempo. When set to Hertz, the LFOs are synchronized to a certain frequency; when set to song tempo, the LFOs are synchronized to the song’s BPM.
- Rate: This knob controls the frequency in Hertz of the LFO (if the rate type is set to Hz) or tempo-synced beat divisions (when the rate type is set to song tempo).
- Phase: This knob controls the amount of offset between the waveforms of the left and right channels. At 180 degrees, the LFOs are completely out of phase.
- Offset: This knob shifts the starting point of each LFO along its waveform. This “shift” is expressed in degrees from 0 to 360.
- LFO Waveform selector: This switches let the user select the waveform of the LFO. The possible options included are sine, triangle, sawtooth down and random. Note when “random” is selected, the “phase” knob changes to “width”, controlling the stereo width of the random LFO waveform.
- Shape: This control pushes the waveforms to their upper and lower limits, ultimately “hardening” the waveforms and making the effect sound more “aggressive”.
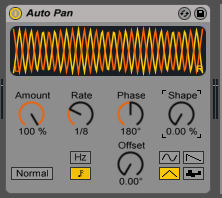
For the purpose of this tutorial, we will be configuring the Auto Pan effect to automatically pan the source following the song tempo at an eight-note pattern. The waveform will be a triangle. Amount of 100%, completely out of phase. The parameters will be configured as:
- Amount: 100%.
- Normal/Invert: Normal.
- LFO Rate Type: Notehead.
- Rate: 1/8.
- Phase: 180 degrees.
- Offset: 0 degrees.
- LFO Waveform selector: Triangle waveform.
- Shape: 0%.
Our Auto Pan audio effect will look like this:

We have now finished configuring our audio effect and it is ready to be used.
We hope you found this tutorial on How to use the Ableton Live AUTO PAN audio effect useful!
CLICK HERE to learn Ableton Live one on one with a digital audio professional at OBEDIA.
