The following tutorial shows the user how to bounce a mix in Studio One 4.
CLICK HERE to learn Presonus Studio One 4 one on one with a digital audio professional at OBEDIA.
The last stage of the mix procedure is to output a stereo file that can be delivered to clients. This stereo file is what engineers normally call a “mix”. Once the mix has been finished by the engineer, it must be “bounced” to a file. This file could be a WAV file format, mp3, or a variety of available options. The most common format used for online sharing or streaming is the mp3.
This tutorial will present a step-by-step guide on how to bounce a mix in Studio One 4.
1. Open the Studio One 4 song that has the mix ready to be bounced:

2. Make sure the start and end markers of the song are positioned between the start and the end of the arrangement on the timeline:

3. From the top menu bar click on: Song -> Export Mixdown:

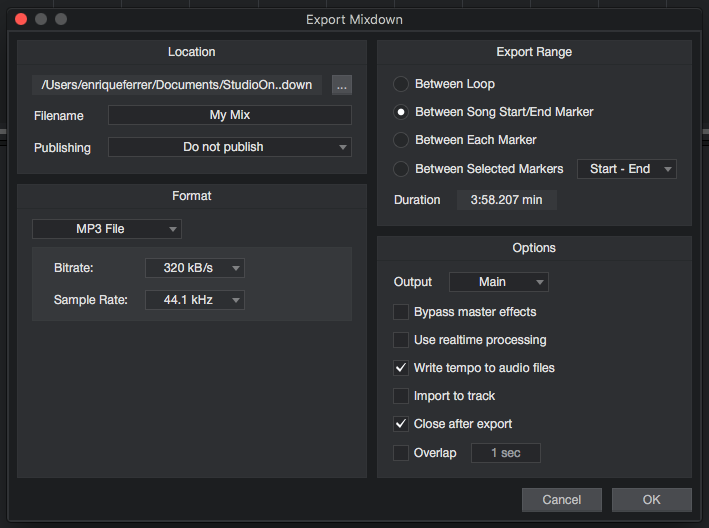
4. The “Export Mixdown” window will appear as:

4. Before applying any changes, all the parameters of this window must be explained:
These parameters are:
- Location: This field lets the user select the location in hard drive where the mix file will be stored. By default it goes to the folder where the Song is stored, however, it can be changed.

- Filename: This field lets the user type the name of the mixdown file.
![]()
- Publishing: This drop-down list lets the user select if the song will be published to Soundcloud, Notion, or simply not published.
![]()
- Format: This drop-down list lets the user select between a variety of audio formats for the mixdown such as WAVE, mp3, AIFF, FLAC, etc.

- Resolution: This drop-down list lets the user select between a variety of audio bit depth options, such as 16, 24, 32, etc.
![]()
- Sample rate: This drop-down list lets the user select between a variety of sample rate options such as 44.1 KHz, 48 KHz, 96 KHz, etc.
![]()
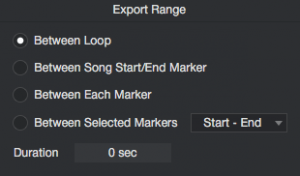
- Export Range: This field lets the different audio exporting ranges.
- Output: This section provides a drop-down list that lets the user select between a variety of analog outputs that want to be used to feed the mixdown file. It also has other miscellaneous options that can be applied.

For the purpose of this tutorial the Export Mixdown window will be configured as:
- Location: default
- Filename: My Mix
- Publishing: Do not publish
- Format: MP3 file
- Bitrate: 320 kbps
- Sample rate: 44.1 KHz
- Export range: Between song start/end marker.
- Output: Main
- Bypass master effects: Unchecked.
- Use realtime processing: Unchecked.
- Write tempo to audio files: Checked.
- Import to track: Unchecked.
- Close after export: Checked.
- Overlap: Unchecked.
5. Apply the parameters to the Export Mixdown window:
The window should look like this:
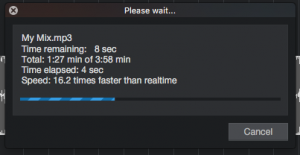
6. Press OK and the rendering process will happen:
As soon as it ends, the Export Mixdown window will close, and the folder where the bounced mix is stored will open as:
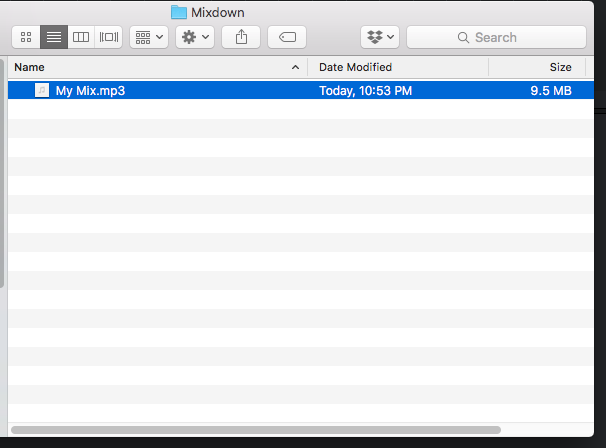
In our case, on an MAC-OS system, the Mixdown is stored by default in: Documents -> Studio One -> Songs -> OBEDIA TUTORIAL -> Mixdown.
At this point we have finished exporting (bouncing) a mix in Studio One 4. The tutorial has now finished.
We hope this tutorial on how to bounce or export a mix in Studio One 4 has been helpful! Call OBEDIA today to learn how to use Studio One 4 from a digital audio professional.
CLICK HERE to learn Presonus Studio One 4 one on one with a digital audio professional at OBEDIA.