This tutorial shows the user How to use the Ableton Live PHASER audio effect.
CLICK HERE to learn Ableton Live one on one with a digital audio professional at OBEDIA.
Ableton’s PHASER is one of the stock audio effects included in Live that is capable of using a series of all-pass filters to create a phase shift in the frequency spectrum of a sound.
This tutorial will present a step-by-step guide on how to configure and use the PHASER audio effect in Live.
1. Create a Live Set with at least one audio track. Make sure the audio track has at least one audio clip assigned to it.

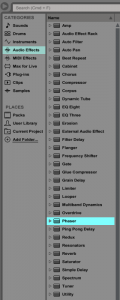
2. From the Browser, search for Audio Effects -> Phaser.

3. Drag and Drop the Phaser audio effect on top of the audio track labeled as “1 Audio”.
As soon as this effect has been dropped on top of the track, it is easy to see how the Phaser audio effect now appears on the device view of the track.

4. Configure the Phaser audio effect for proper usage
Now that we have added the effect to our audio track, we can explain each of the parameters included. The following picture shows the graphic interface of this audio effect.

Phaser has several different parameters we can control, these are:
- Poles: This knob controls the amount of notches created in the frequency spectrum.
- Feedback: This slider can be used to invert the waveform and convert the notches in the frequency spectrum into peaks (or poles).
- Frequency: This slider controls the filter cutoff frequency. This can be adjusted at the same time with the Feedback control using the X-Y controller.
- Earth/Space selector: This switch toggles between “Earth” mode and “Space” mode. These two modes change the spacing of the notches along the spectrum, therefore coloring the sound.
- Color: This slider can be used when “Earth” mode is selected in order to adjust the Phaser’s timbre.
- Dry/Wet: This knob controls the balance between the processed and the original signals. If set to 100%, the output of the device is only the processed signal.
- Envelope Amount: This knob controls the intensity of the envelope follower.
- Envelope Attack and Release: These knob control how quickly the envelope responds to rising of input levels.
- Modulation Amount: This knob controls the intensity of the modulation applied to the input signals.
- LFO Shape: This selector lets the user pick between different LFO waveforms such as sine, triangle, saw-tooth, square and noise.
- Rate: This knob sets the frequency of the LFO when the rate type is set to Hz, or the tempo-synced beat divisions when set to note head.
- Rate Type: This button lets the user toggle the LFO rate type from Hz (LFO synced to a certain frequency) to note head (synced to the song tempo).
- Phase: This knob controls the LFO Phase by adjusting the amount of offset between the waveforms for the left and right channels. At 180 degrees, they are both perfectly out of phase.
- Offset: This knob shifts the starting point of each LFO along its waveform (when LFO Stereo mode is set to “phase”) or detunes the two LFO speeds relative to each other (when LFO Stereo mode is set to “Spin”).
- LFO Stereo Mode: These switches let the user toggle the method of LFO offset between “Phase” and “Spin”.
For the purpose of this tutorial, we will be configuring Phaser to create a soft phasing effect on our audio track. The parameters will be set as the following:
- Poles: 5.
- Feedback: 0.61.
- Frequency: 2.29 KHz.
- Earth/Space selector: Earth.
- Color: 8.59%.
- Dry/Wet: 100%.
- Envelope Amount: 0%.
- Envelope Attack and Release: 6ms for Attack and 200ms for Release.
- Modulation Amount: 40.5%.
- LFO Shape: Sine.
- Rate: 0.45%.
- Rate Type: Hz.
- Phase/Spin: Spin at 18%.
- Offset: N/A.
- LFO Stereo Mode: Spin.
Our final configuration will look like this:

We have now finished configuring our audio effect and it is ready to be used.
We hope you found this tutorial on How to use the Ableton Live PHASER audio effect useful!
CLICK HERE to learn Ableton Live one on one with a digital audio professional at OBEDIA.