The following tutorial shows the in-depth metronome configuration in Studio One 4.
CLICK HERE to learn Presonus Studio One 4 one on one with a digital audio professional at OBEDIA.
The previous tutorial explained the metronome basics in Studio One 4. However, we left the “Metronome Setup” window for this tutorial since it has in-depth features that must be explained separate.
This tutorial will present a step-by-step guide on the metronome setup window in Studio One 4.
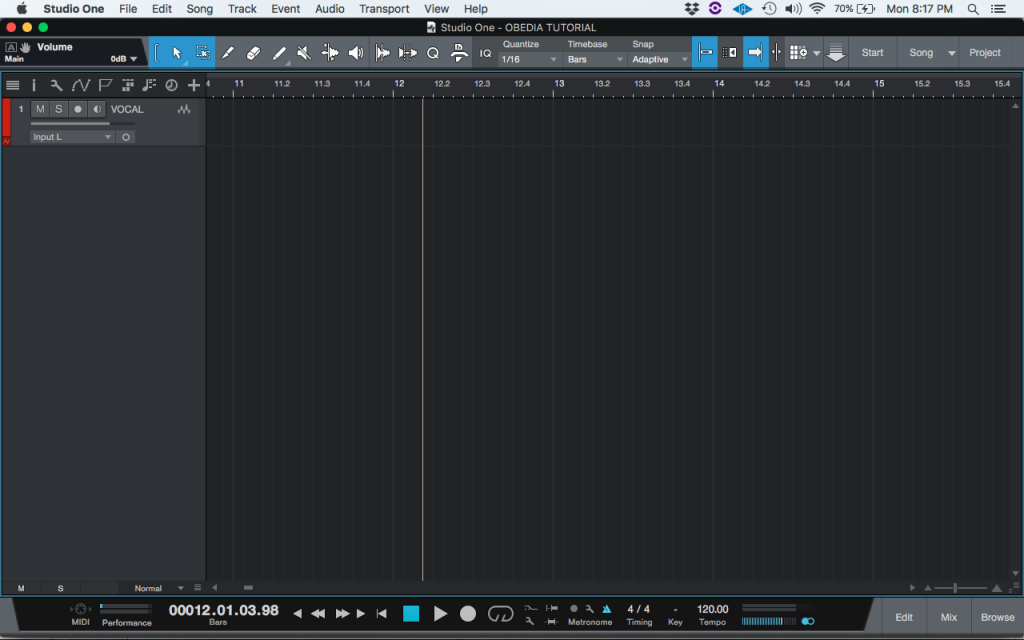
- Open or create a new Studio One 4 song:

2. Locate the transport bar:
![]()
3. Locate the metronome setup option:
![]()
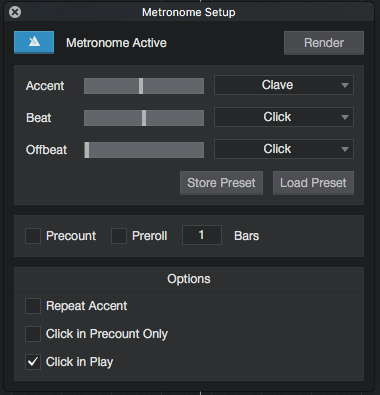
4. Click on it, and the “Metronome Setup” window will appear as:

This window presents several options that can be configured, these options can be explained as:
- Metronome Active: This switch can toggle the metronome ON/OFF. When ON it will be displayed as light blue, when OFF it will be grey.
![]()
- Render: When clicking on this option, the metronome will be rendered into an audio track.
![]()
- Accent: The slider on the left lets the user set the level of the accent beat, which is the first beat of the measure. The drop-down list next to it lets the user select the type of sound it will play.
![]()
- Beat: The slider on the left lets the user set the level of the non-accent beats, which are normally all the beats but the first one. The drop-down list next to it lets the user select the type of sound it will play.
![]()
- Offbeat: This feature is normally used optional. The slider on the left lets the user set the level of the off-beats. The drop-down list next to it lets the user select the type of sound it will play.
![]()
- Precount: This option lets the user turn the precount ON/OFF by either checking or unchecking the box next to it, as well as determining the number of bars it will happen.
![]()
- Preroll: This option lets the user turn the preroll ON/OFF by either checking or unchecking the box next to it, as well as determining the number of bars it will happen.
![]()
- Repeat Accent: This check box lets the user turn the repeat accent ON/OFF. When this is ON, the accent will be repeated, meaning if the time signature is set to 6/8 for example, the click will be played as 3/8 twice.
![]()
- Click in precount only: This option will make the click play only during the precount when checked.
![]()
- Click in play: This option will make the click play during the the playback stage when selected.
![]()
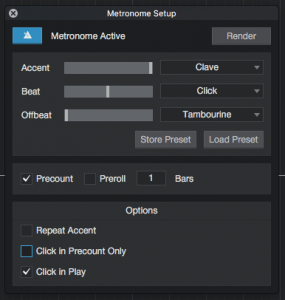
5. Configure the “Metronome Setup” window for the purpose of this tutorial:
For this tutorial, we will make sure the metronome plays during a 2-bar precount as well as during the playback stage. Also, we will raise the level of the accent beat to make it even more obvious.
The configurations should be:
- Metronome Active: ON.
- Accent Level: All the way up.
- Accent Sample: Clave.
- Beat Level: In the middle.
- Beat Sample: Click.
- Offbeat Level: All the way down (disabled).
- Offbeat Sample: Tambourine.
- Precount: Checked.
- Preroll: Checked.
- Repeat Accent: Un-checked.
- Clink in precount only: Un-checked.
- Click in play: Checked.
After applying the changes, our “Metronome Setup” window will look like this:

The window can be closed now and the configurations will be automatically applied to the Studio One 4 song.
At this point all the Metronome Setup window has been configured and the recording process can start. The in-depth metronome configurations have been explained. The tutorial has now finished.
We hope this tutorial on the in-depth metronome configurations in Studio One 4 has been helpful! Call OBEDIA today to learn how to use Studio One 4 from a digital audio professional.
CLICK HERE to learn Presonus Studio One 4 one on one with a digital audio professional at OBEDIA.
